Over the course of this week I’ve been at the hangar a few times to take care of random stuff prior to mounting the wings.
Before we moved the fuse to the hangar, I installed and secured the rudder/tailwheel steering cables to the tailcone. It would have been good to check the plans and see which end of the cables attach to the rudder control horn (the two ends of the cable aren’t the same), but I neglected to do that. Compounding that mistake, I had already fished the cables through several holes in the tailcone and aft fuse and installed snap-in plastic grommets in those holes that make it impossible to remove the rudder cable once they’re installed. As an extra bonus, the grommets can be installed with access to one side of a hole, but access to both sides of the hole is required to remove them – which is a problem in several places in the tailcone and baggage area where panels are already riveted in place that limit access. D’oh!
Other builders have made this mistake and wound up drilling out rivets and removing panels to get at the grommets, but I was determined not to do that. So…I went on a trek to Home Depot (there’s one about five minutes from the hangar – bonus!) and bought a small propane torch and an X-Acto knife. A red-hot knife slices through plastic pretty easily, and working from one side of the hole, it’s not too hard to slice out the clips that hold the grommets in place. After an hour of heating and cutting, the grommets and the rudder cables were out. 30 minutes later, the rudder cables were installed the right way.
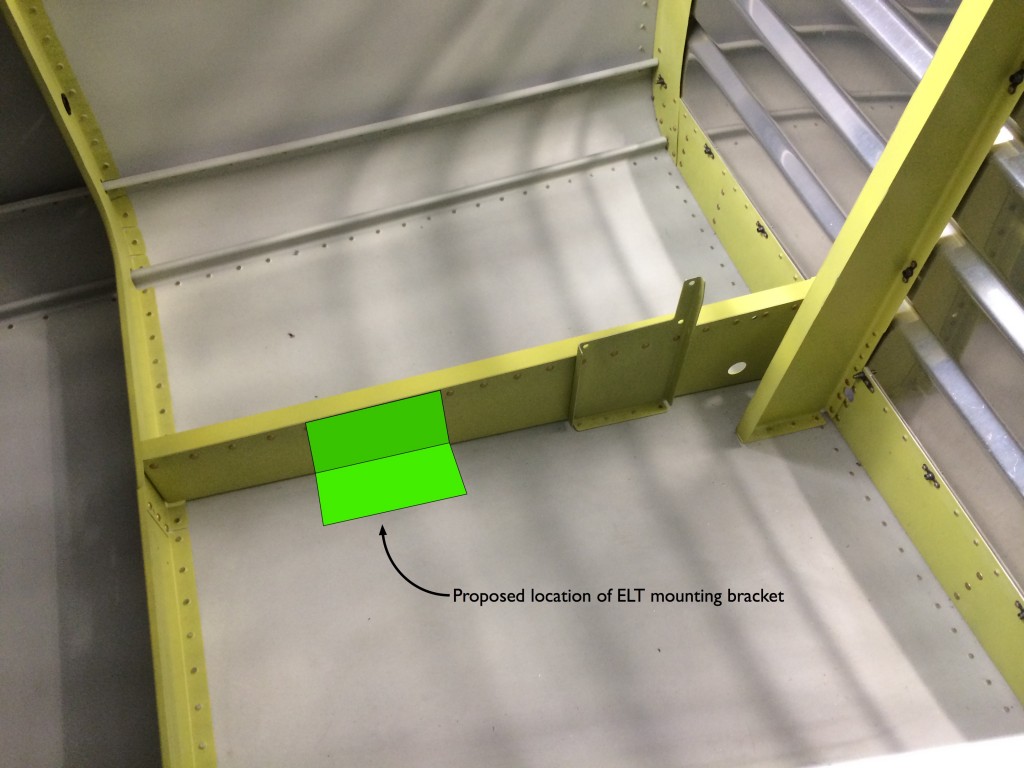
I also started working on the Emergency Locator Transmitter (ELT) mount. Over the last several months I’ve been working out where to install the ELT and have never been very happy with a lot of the options I’ve seen, including Van’s own ELT/strobe mounting plate which seems far too flexible to ensure that the ELT will work when it’s supposed to. Many RV builders regard the ELT as a bureaucratic nuisance and don’t care how it’s installed. They’re certainly free to do as they see fit, but if the device has to be in the airplane, I want it to work as it’s designed to.
My friend Andy mounted his ELT on the horizontal bellcrank rib, which seems like a good place for both longitudinal strength and access for installation, testing and battery changes. The only downside is that the rib doesn’t have a lot of lateral stiffness, and theoretically the ELT mounting surface should withstand a 100-pound pull in any direction without deflecting more than 0.1 inch. I came up withe the idea of fabricating an L-shaped reinforcement plate to provides extra stiffness, and had my fellow FAA DER Tom – who’s a structures engineer – run the numbers to make sure my design would be strong enough while not impacting the existing structure.
 It turns out from Tom’s analysis that a piece of 0.040″ 7075-T6 aluminum sheet, bent into the required L-shape, will do the job nicely. It will be held in place on the vertical flange with ELT mounting bolts and the rivets which also attach the bellcrank stiffener angle, and on the horizontal flange with some AN426-3 rivets. Easy peasy! The only downside is that my candy-ass little Harbor Freight bending brake won’t handle 0.040″ 7075 sheet, so I’m gonna have to find someone with the appropriate tools to make the bend. Stay tuned…
